On April 1st every year, I set my Mac up for the new financial year. This looks like:
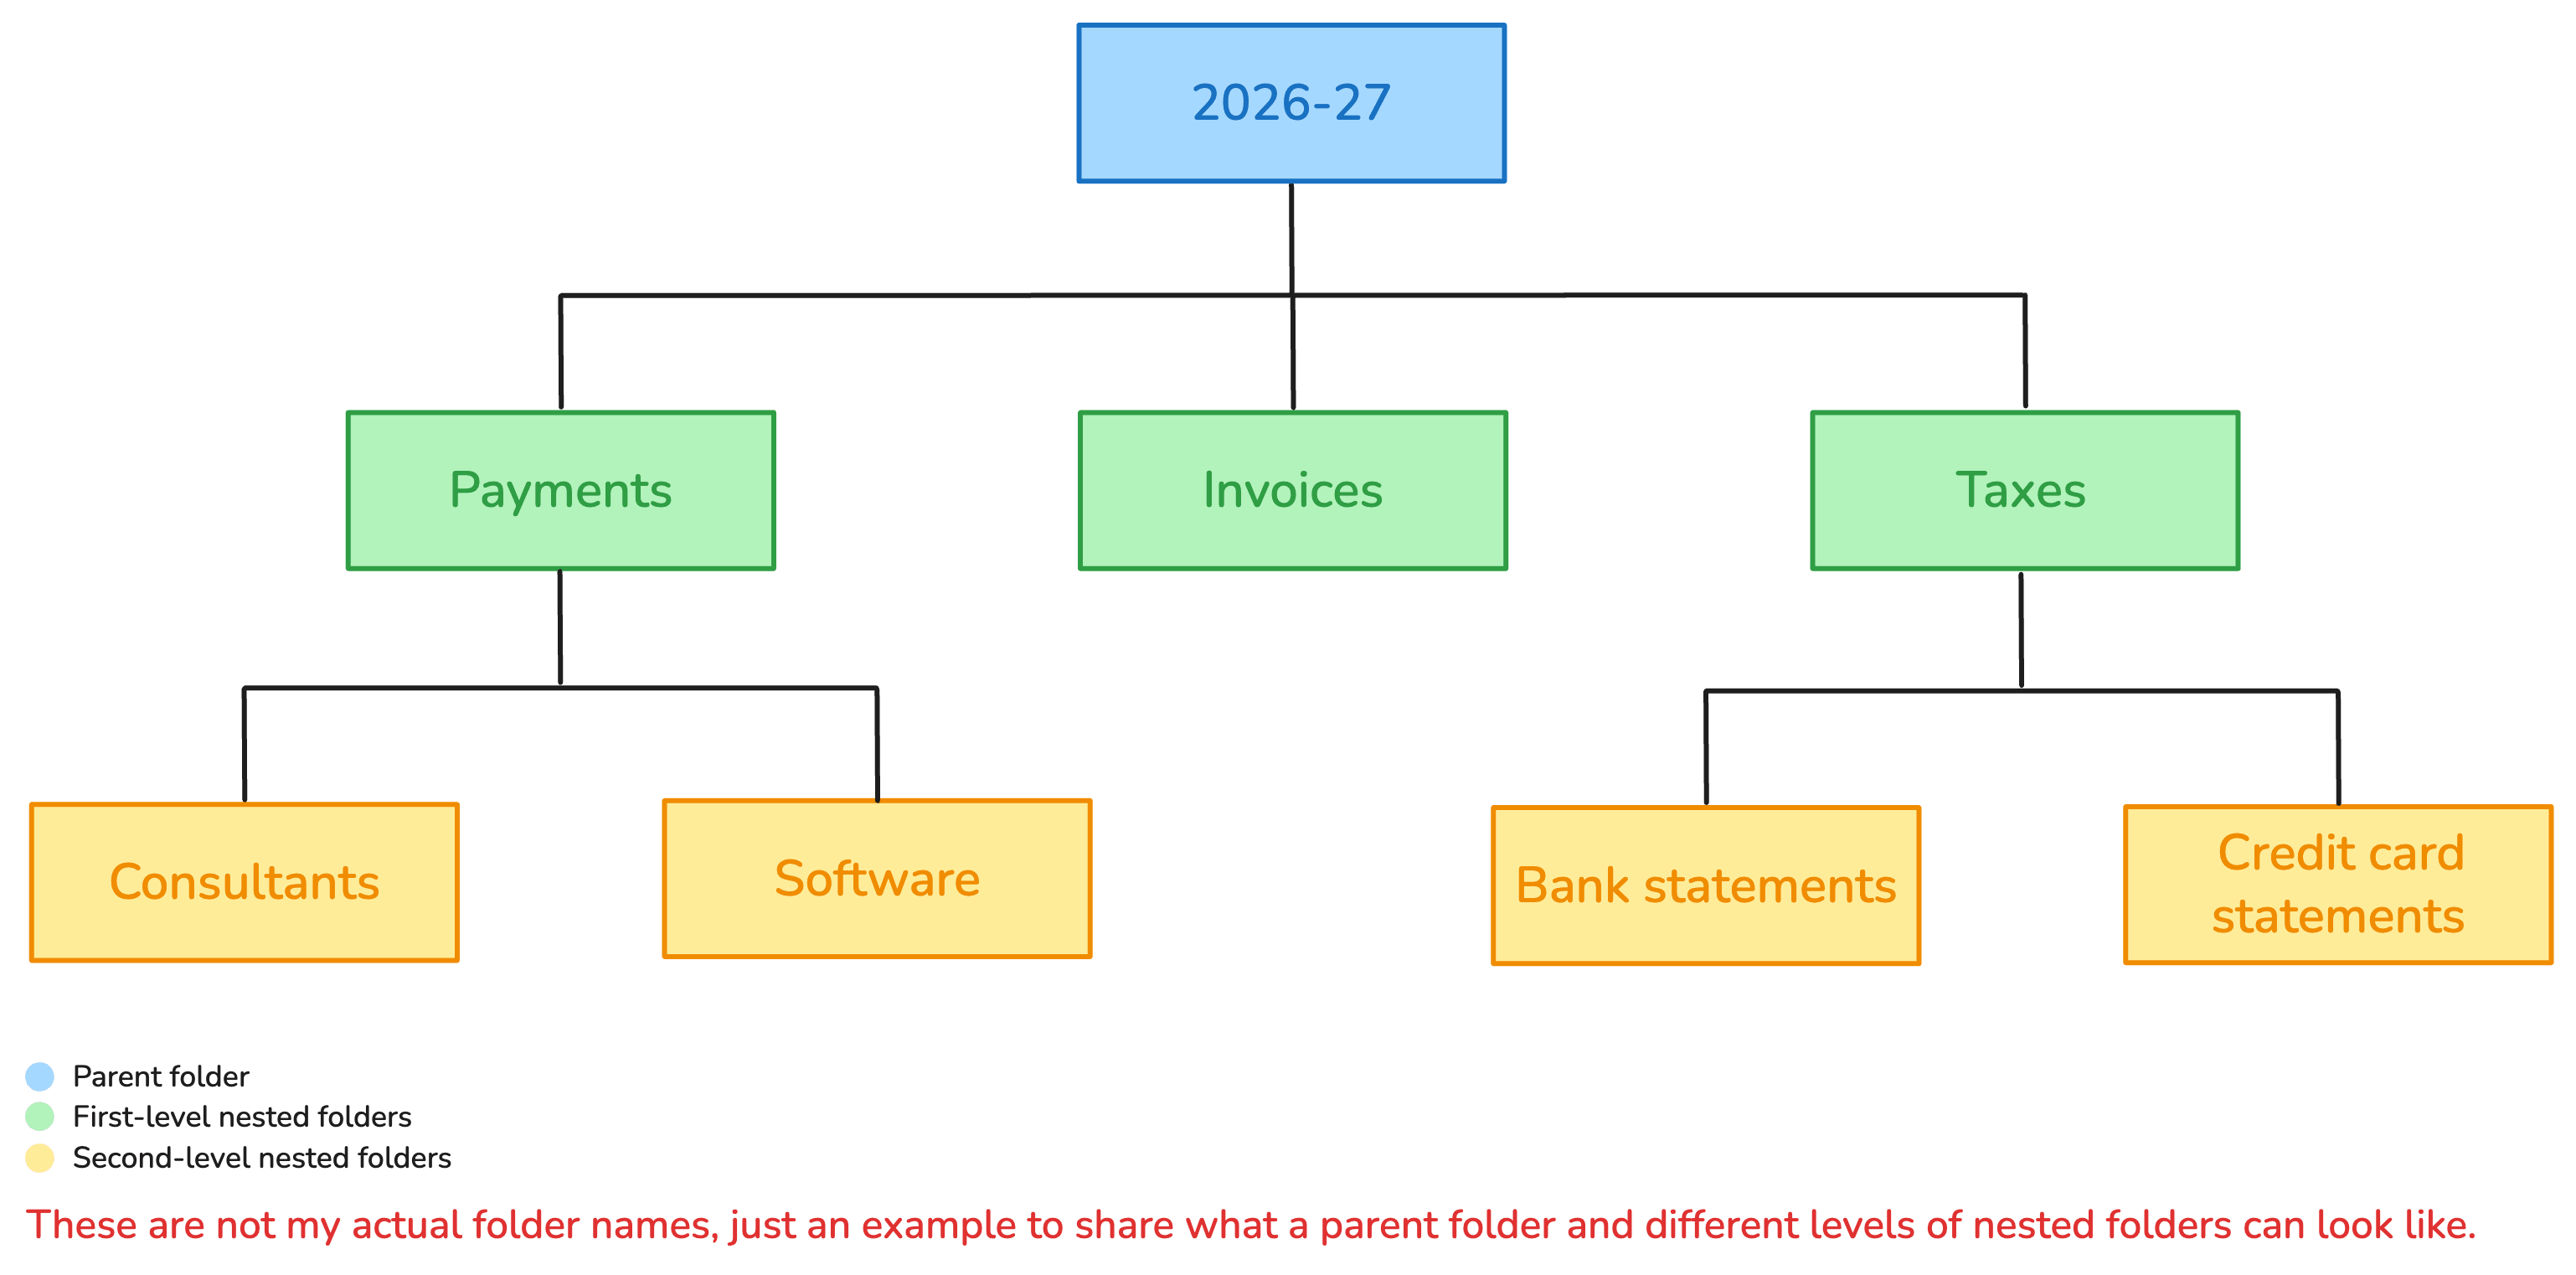
- A parent folder named [financial year] e.g. for this year, it’s 2026-27
- Nested folders for invoices raised, payments made, and income tax return (ITR) related things: advance tax, bank statements, credit card statements, etc.
In all, that’s 14 folders with specific names and nesting rules I set up alongside Alfred and Hazel workflows.
Because it’s an annual affair, I don’t actually remember these names and nesting rules. I have to look at the previous year’s folders and manually duplicate that structure for the new financial year. The end result is what I need, but the process to get there is a waste of time.
So I automated it using native, built-in Mac apps: Shortcuts and Automator.
In this post, I’ll share:
- A step-by-step walkthrough of how to create the automated workflow
- How to transfer this automation to a new Mac
Step 1: Identify what you need from the automation
Before you start building in Shortcuts, here’s what you need to figure out:
- Schedule: What date do you need the automation to run on?
- Location: Where should the folders be created? Desktop, Documents, a specific Dropbox/OneDrive path, or somewhere else?
- Folders: What folders should the automation create? If you’re setting up a folder system from scratch, map out the hierarchy and folder names now. You’ll set them once, and the automation will use them each year when it runs, so choose something clear and descriptive.
- Calculations: Do folder names need dynamic values like dates? (This tutorial explains how to set up date calculations).
Once you have all these questions answered, you’re ready to start building.
Step 2: Set up the dates you need in the folder names
Open the Shortcuts app on your Mac and create a new Shortcut.
- Name your Shortcut in the title field.
- Search for ‘date’ in the search bar in the right panel.
- Drag the action simply titled ‘Date’ to the left panel. It’ll show up as Current Date.
- Drag the action titled ‘Format Date’ to the left panel and place it below Current Date.
- Click on the arrow, set the date format to ‘Custom’, and type ‘yyyy’ in the format string.
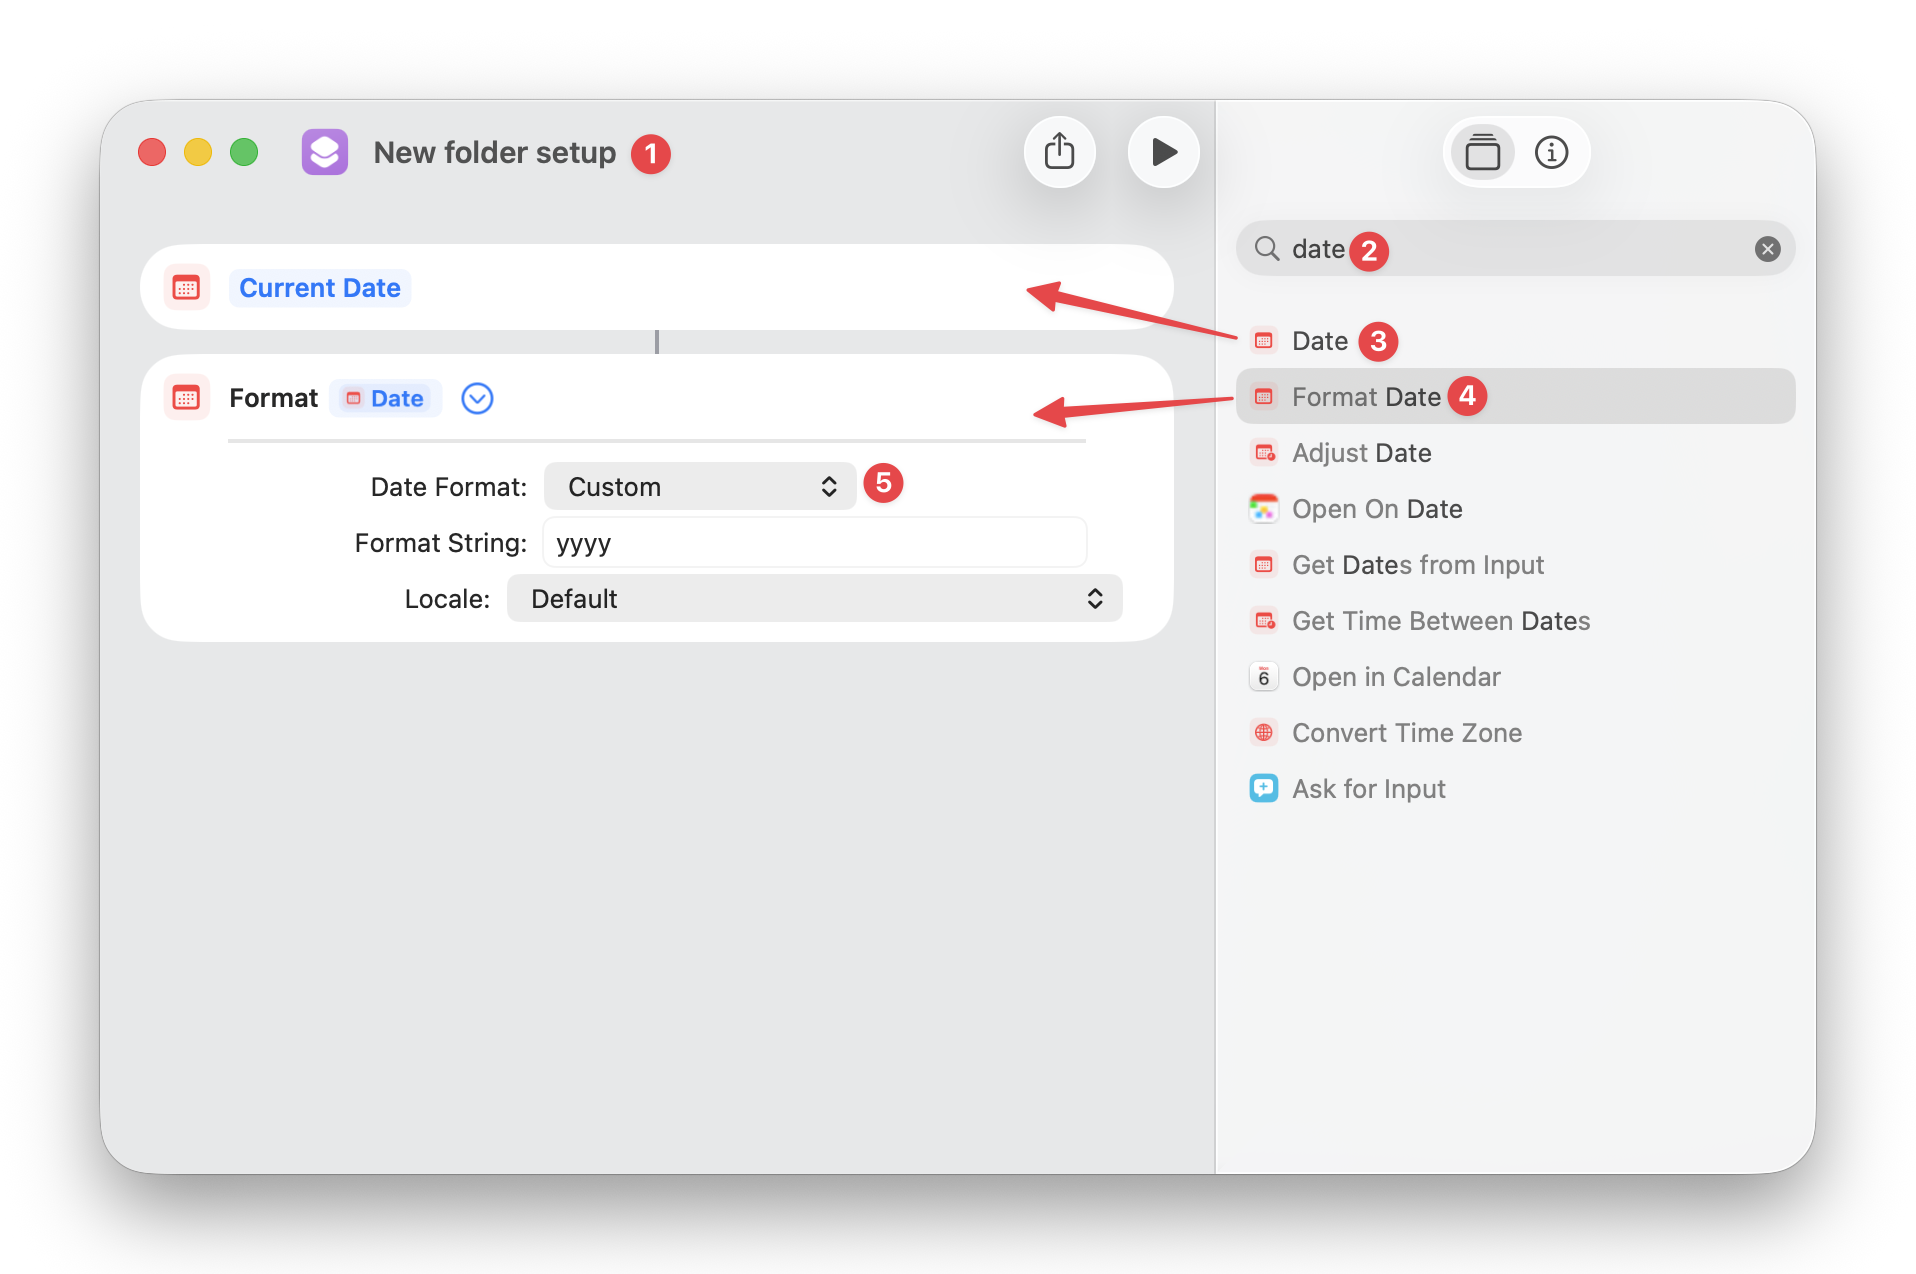
This formats the current year as four digits, like 2026. You’ll grab the year from this formatted date to use in the folder name and any calculations.
💡 Tip: If you’re working with a financial year that runs from January to December, you don’t need to perform any calculations. Instead, click on Current Date at 3 above, search for and select ‘New Year’s Day’. Leave ‘Next Occurrence’ as is. Format the date, then skip the rest of this section and go straight to Step 3: Create the parent folder.
If your financial year starts in one calendar year and ends in the next — 2026-27 — continue with the steps below.
- Search for and drag ‘Get Numbers from Input’ to the left. You want to check that the input automatically becomes Formatted Date here.
- Then, search for and drag ‘Calculate’ to the left. The input should automatically become Numbers here. Add ‘1’ in the field after the plus sign.
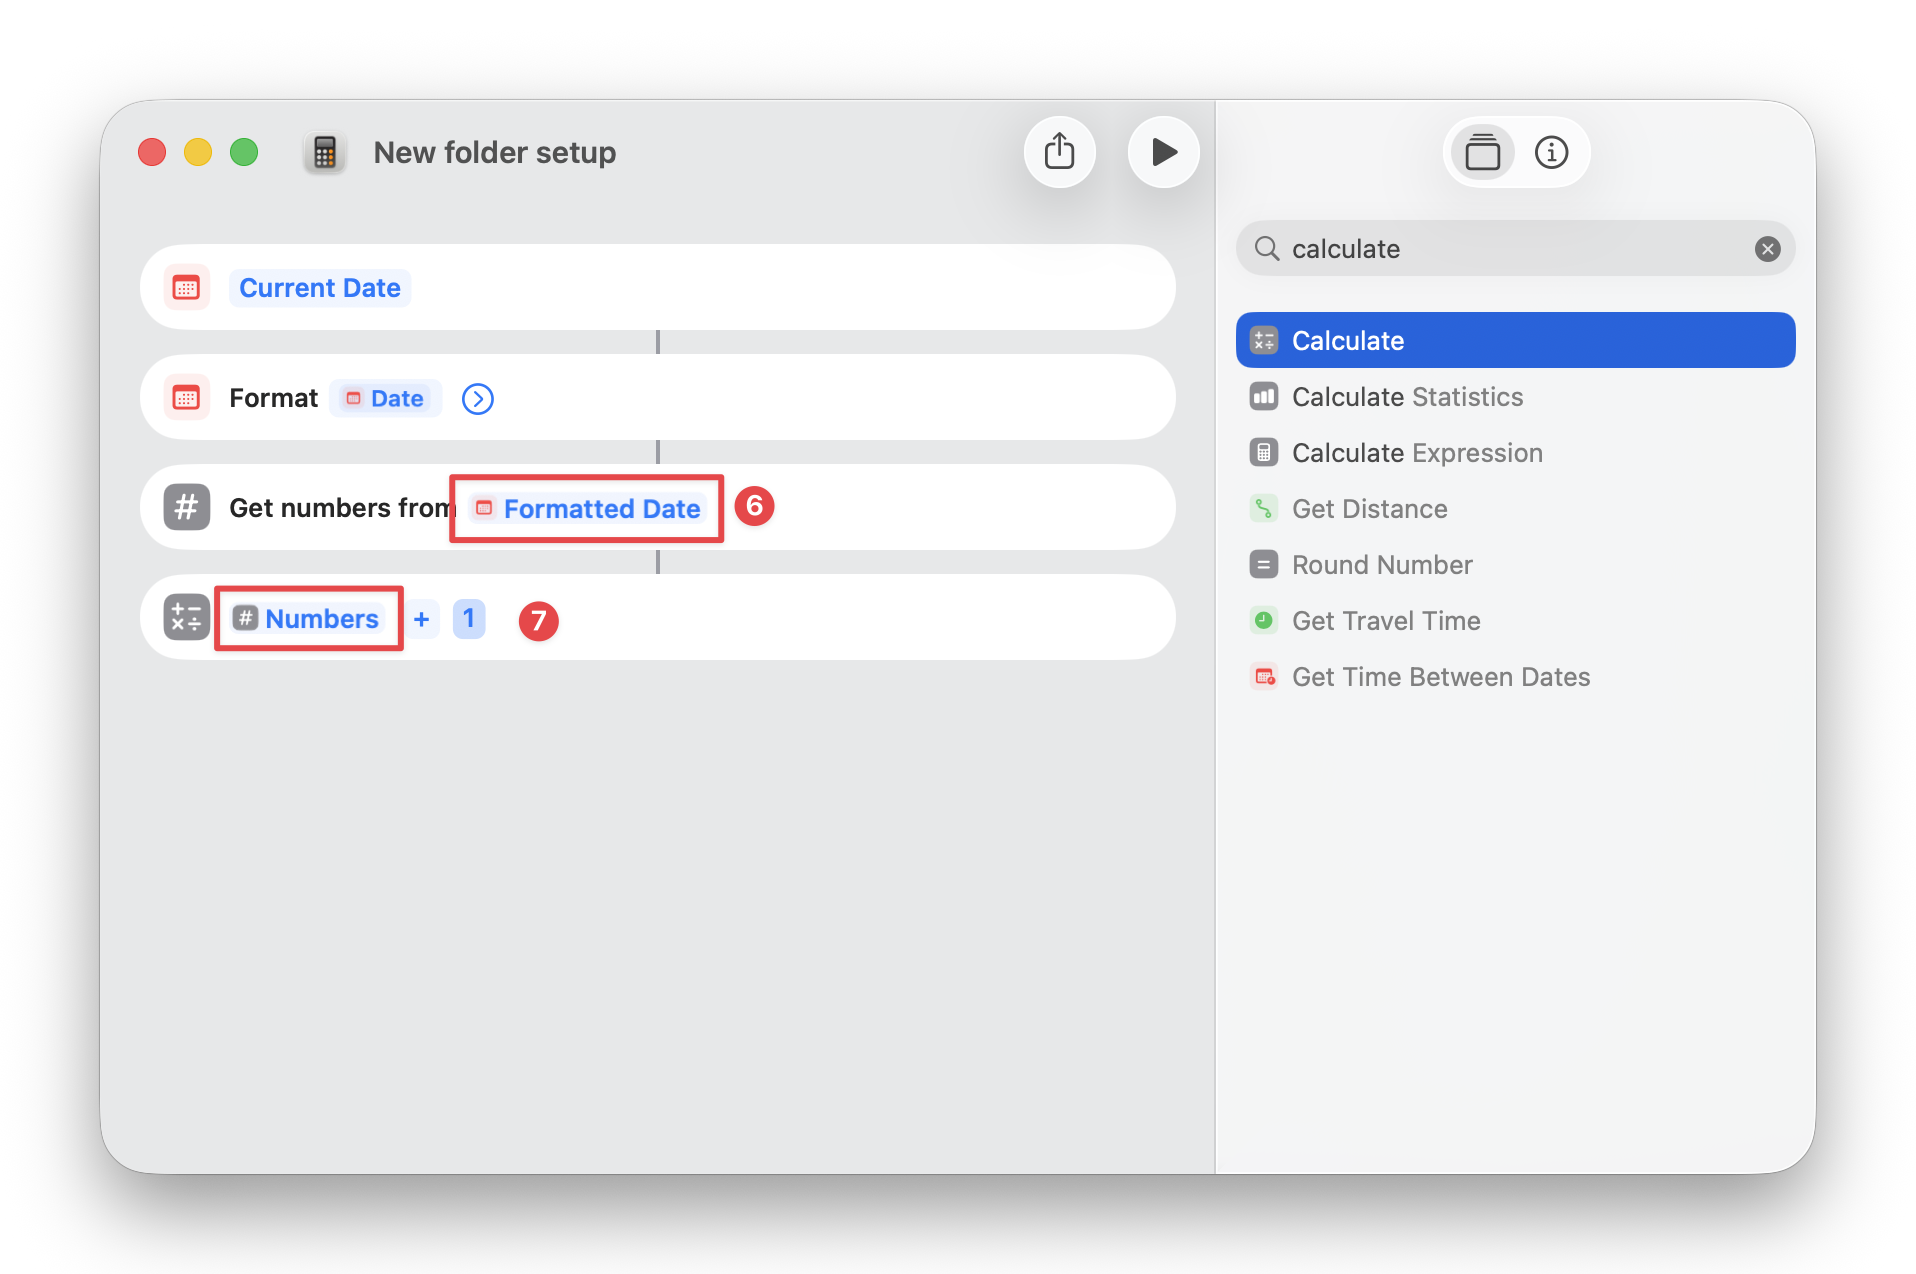
Since you’ve used your formatted date (the four-digit current year) as the input, your calculation result will be the next year: in this case, 2027. Next, you need to turn this from a date into text.
- Search for and drag ‘Get Text from Input’ to the left. The input should automatically change to Calculation Result.
- Then, find and drag ‘Replace Text’ to the left. Replace ‘Hello’ with ‘20’. Don’t add anything to the next field, which says ‘World’.
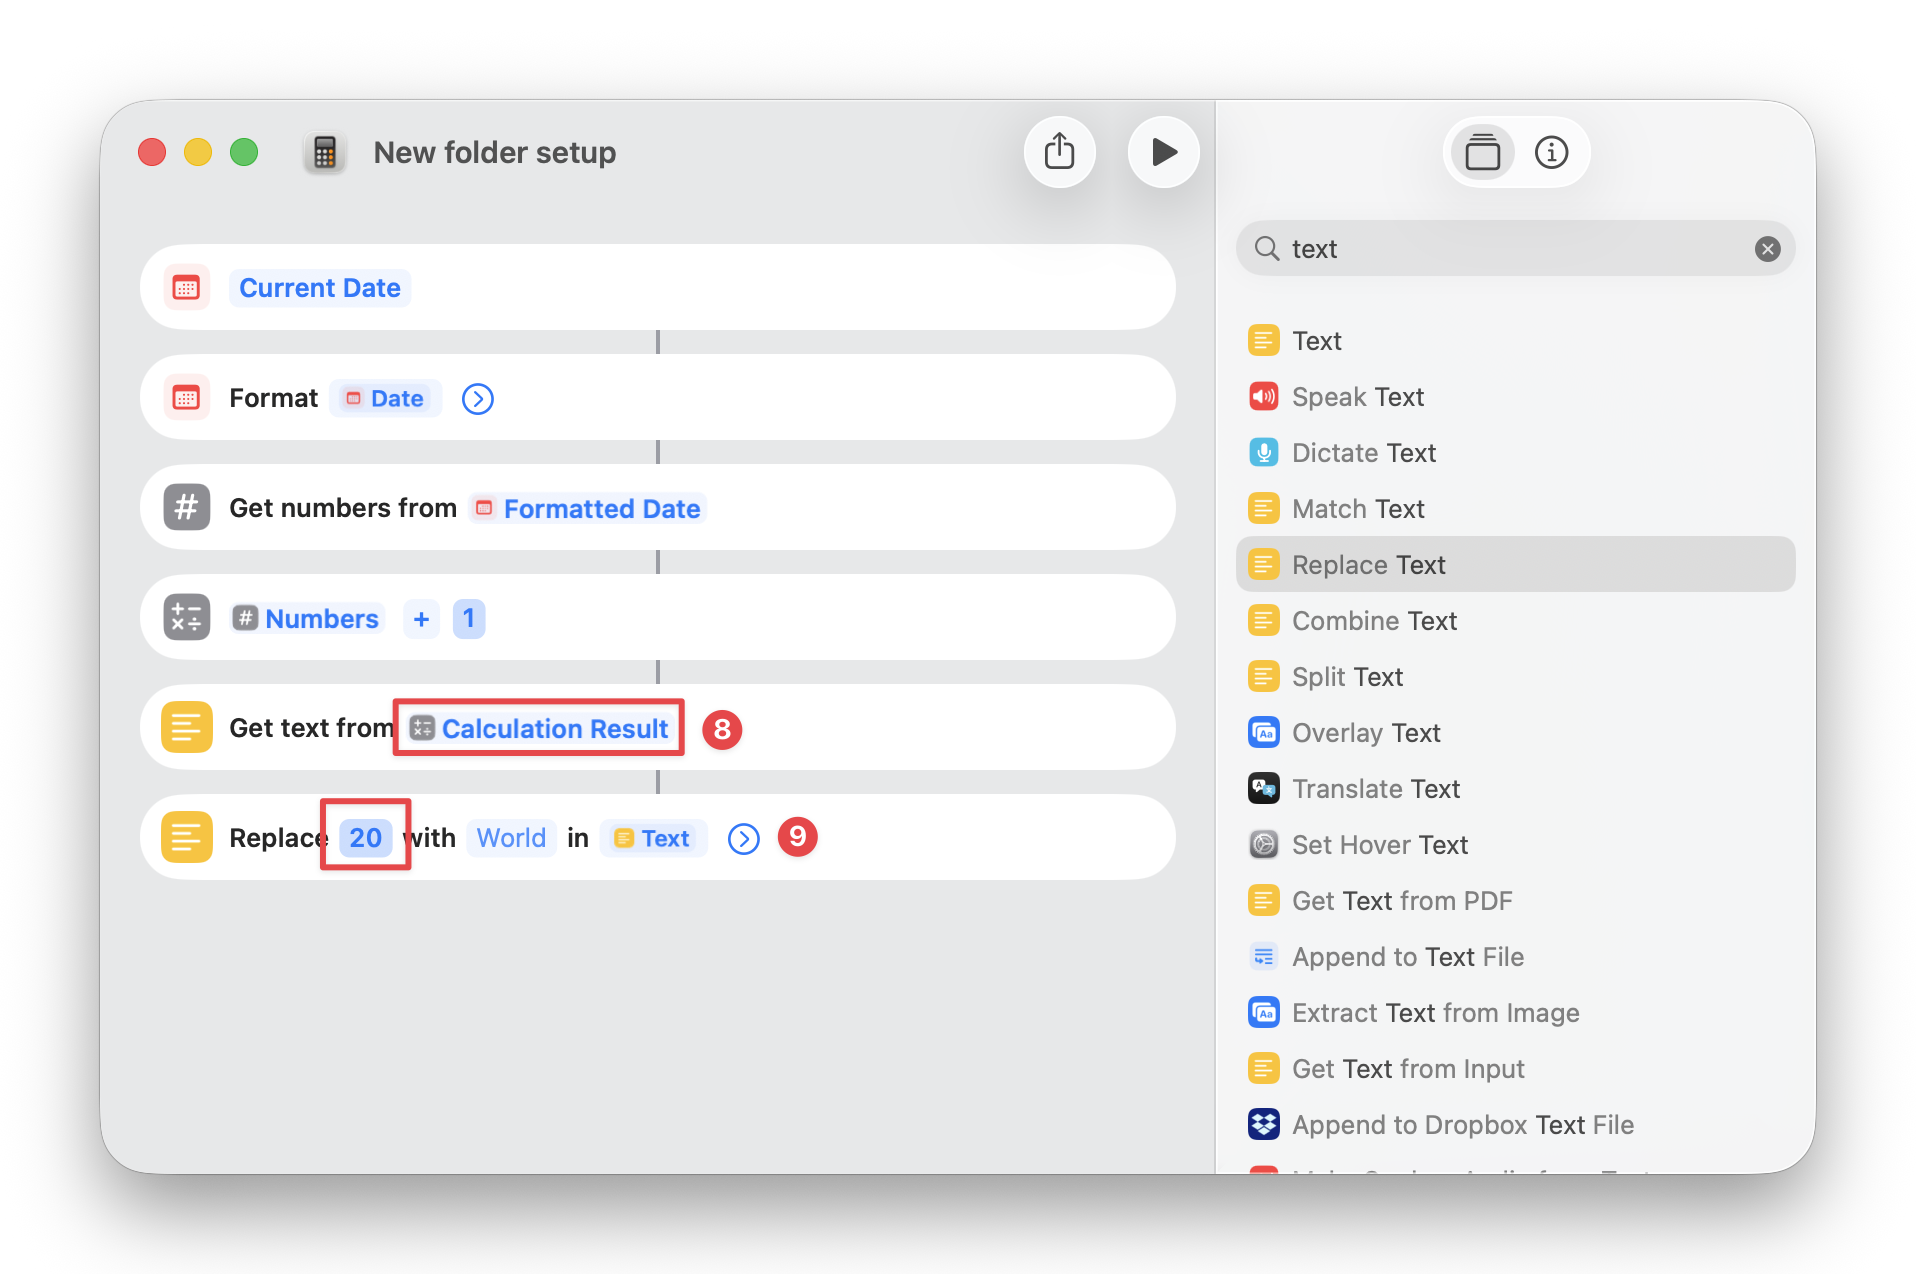
What you’ve done here is taken the calculation result from step 7 (i.e. 2027) and replaced the ‘20’ with nothing, leaving you with 27. Now it’s time to combine the two numbers for your folder name.
- Search for and drag ‘Text’ to the left panel and type the following: [Formatted Date]-[Updated Text]
💡 Tip: When you start typing these in, you’ll see the variables pop up on screen. Don’t hit return! For some reason, hitting return doesn’t accept the variable. Select it with the cursor instead.
You’ve set up the parent folder name. In the next step, you’ll create the folders.
Step 3: Create the parent folder
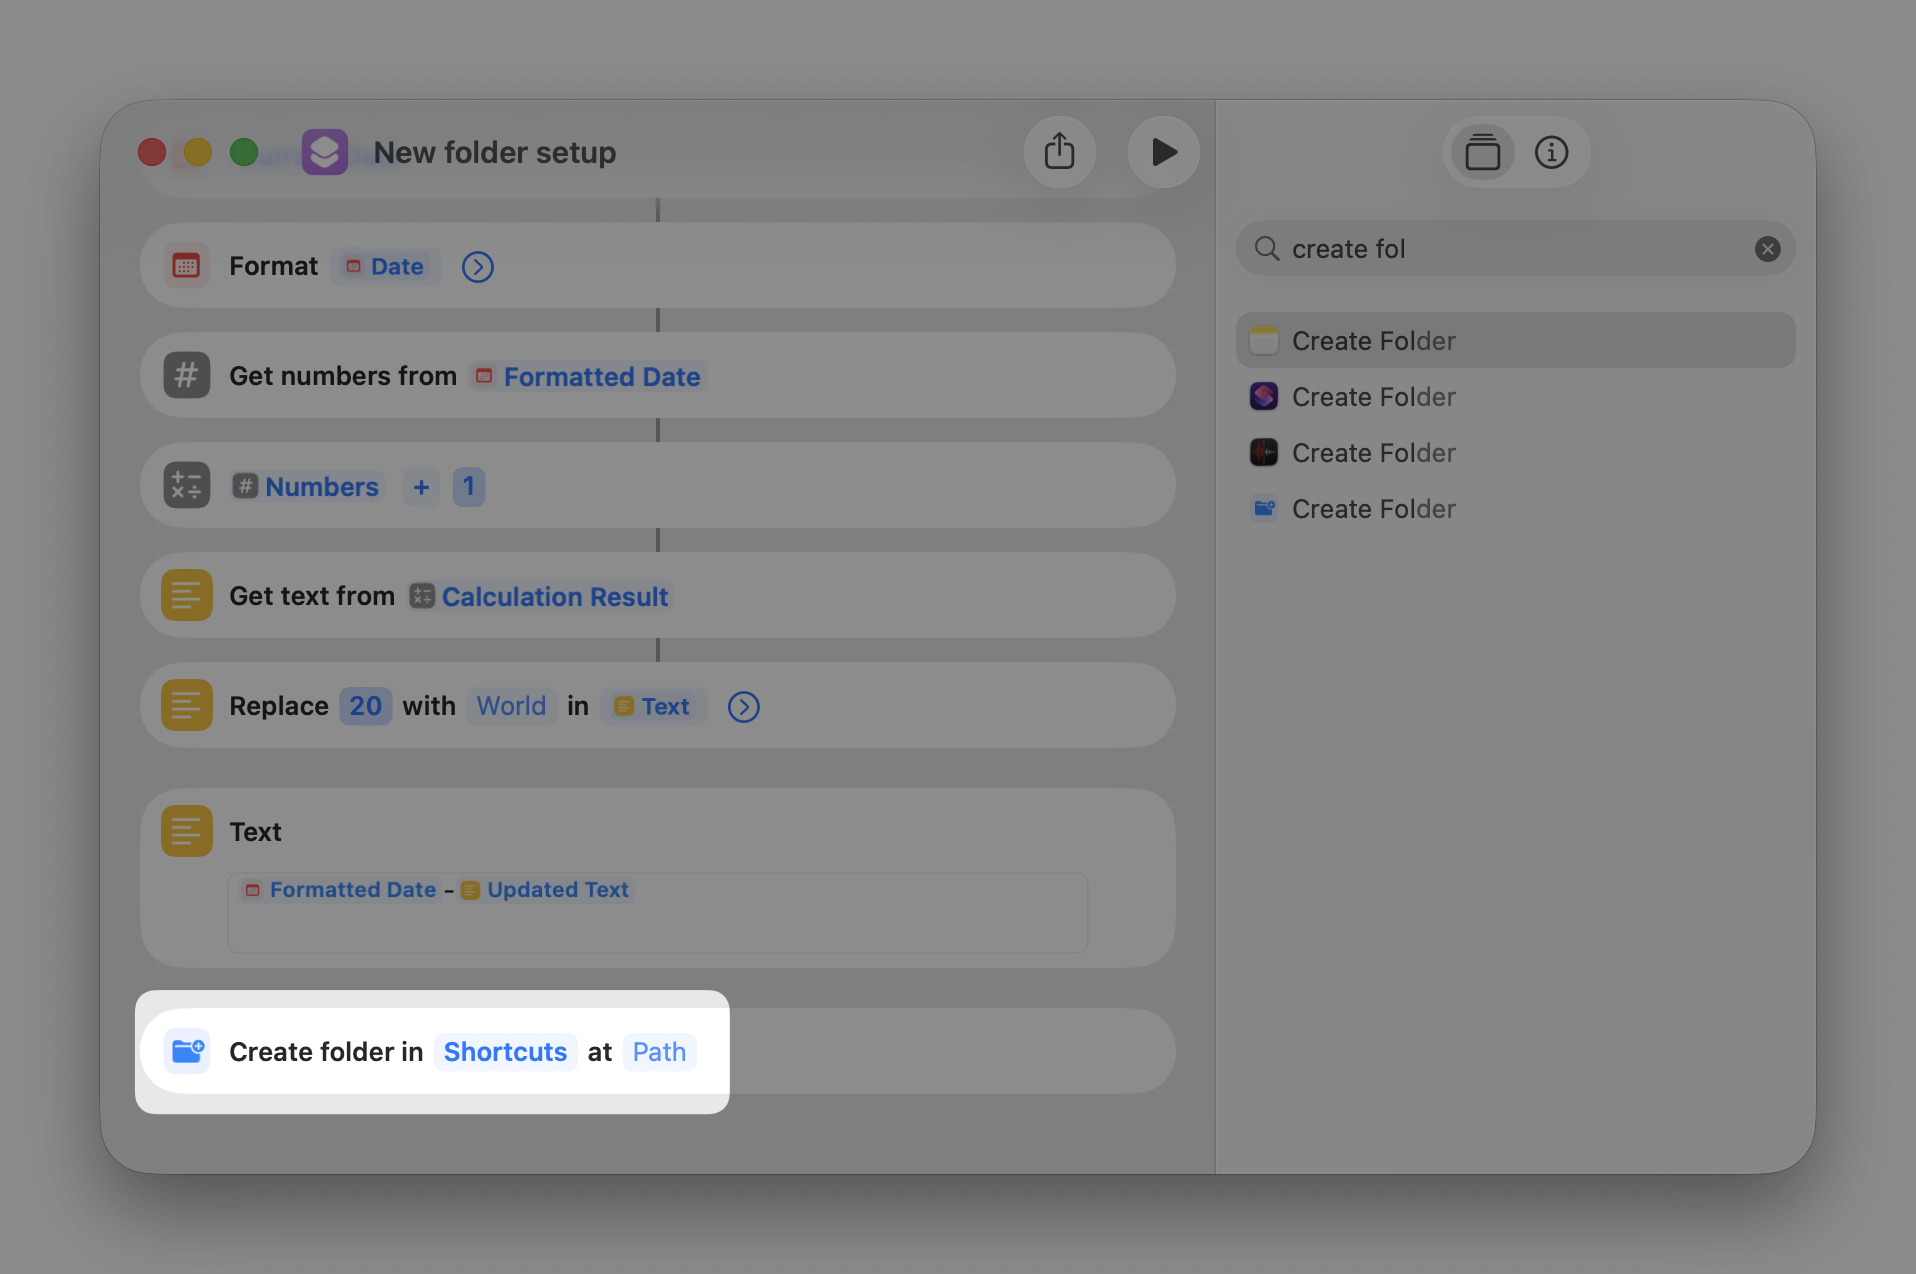
Search for ‘create folder’ in the search bar. You’ll find that option for multiple apps that you can recognize from the icons: Notes, Shortcuts, Voice Memos, New Folder (in Finder). Make sure you select the option for folders in Finder and drag it to the left.
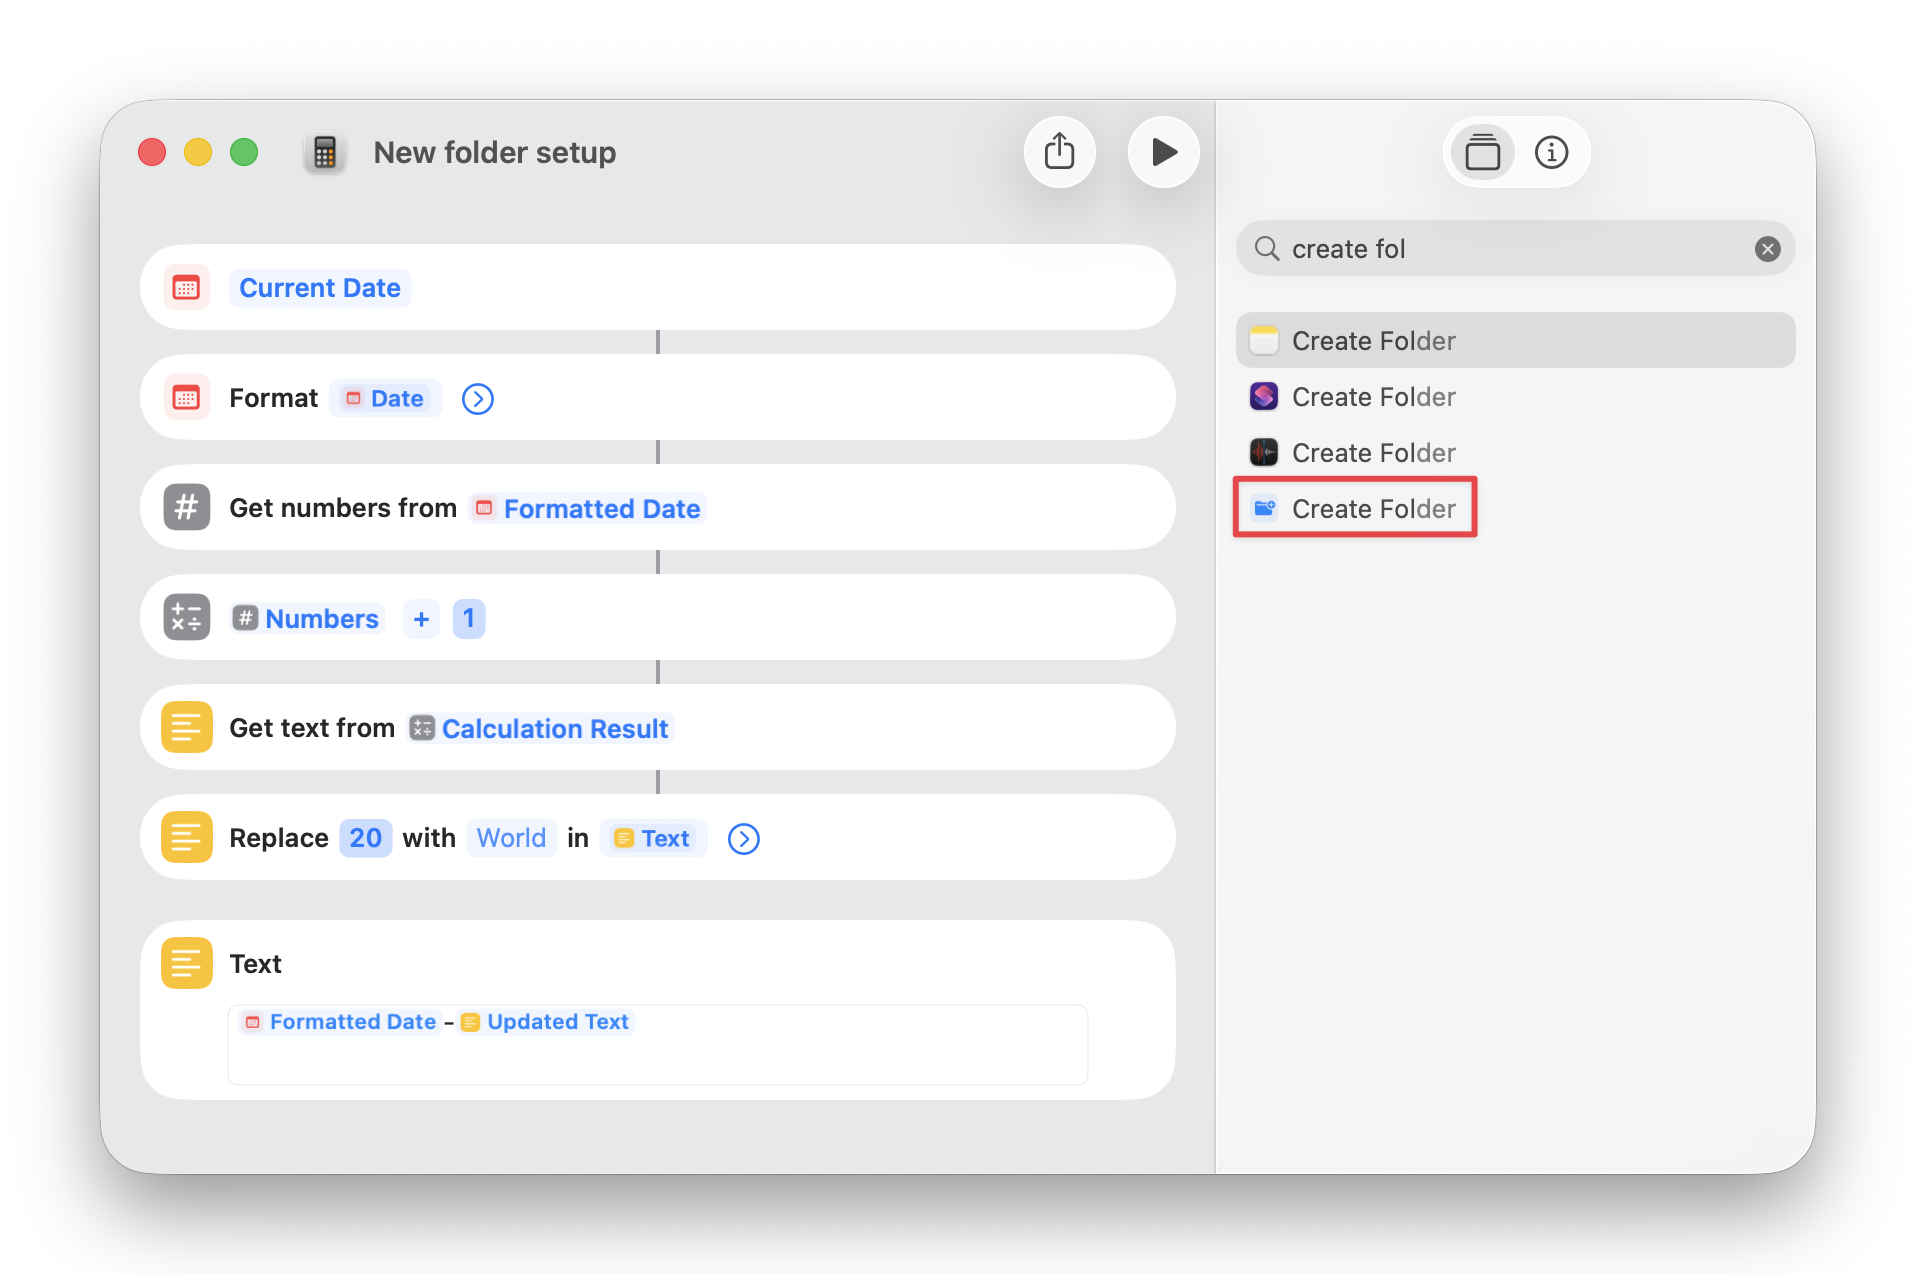
You’ll see these options:
Create folder in [Shortcuts] at [Path]
Click on Shortcuts and choose where you want the automation to create new folders every year. This could be Documents, Desktop, or in a Dropbox, OneDrive, or Google Drive folder.
Path is where you’ll type the parent folder name you set in Step 2.
- If you’re using a cross-year structure (2026-27): type Text
- If you’re using a single calendar year: type Formatted Date
Select the variable when it appears. You’ve now created the parent folder in which all your nested folders will live.
💡 Tip: Click the Play button to test the workflow at this step before setting up nested folders. Remember to delete the folder that the test creates. The automation won’t work if there’s already a folder with the same name the next time you run it.
Step 4: Create the sub-folders
Next, you’ll create the first-level nested folders.
- Drag the Create Folder action to the left panel again.
- This time, right click on [Shortcuts]. The workflow will expand. Select ‘Created Folder’ from the step that created the parent folder.
- Type the name of this new first-level folder in [Path].
Repeat steps a to c for each first-level folder. Pay extra attention when you select the parent folder. If you choose the wrong one, you’ll end up with an accidental second-level nested folder.
Test the automation again, then delete the parent folder again before continuing.
Repeat steps a to c for the second-level nested folders, with a few small tweaks to make it easier:
- Drag the Create Folder action to the left panel. This time, place it right below the first-level folder it should live in. This makes it easier to select the correct folder when setting it up.
- Right click on [Shortcuts]. When the workflow expands, select ‘Created Folder’ from the step that created the first-level folder you’re looking for.
- Type the name of this new second-level folder in [Path].
You can create multiple levels of nested folders using this process. Pay extra attention to which folder you select in step b to set them up without a hitch.
Test again, and then delete the parent folder again.
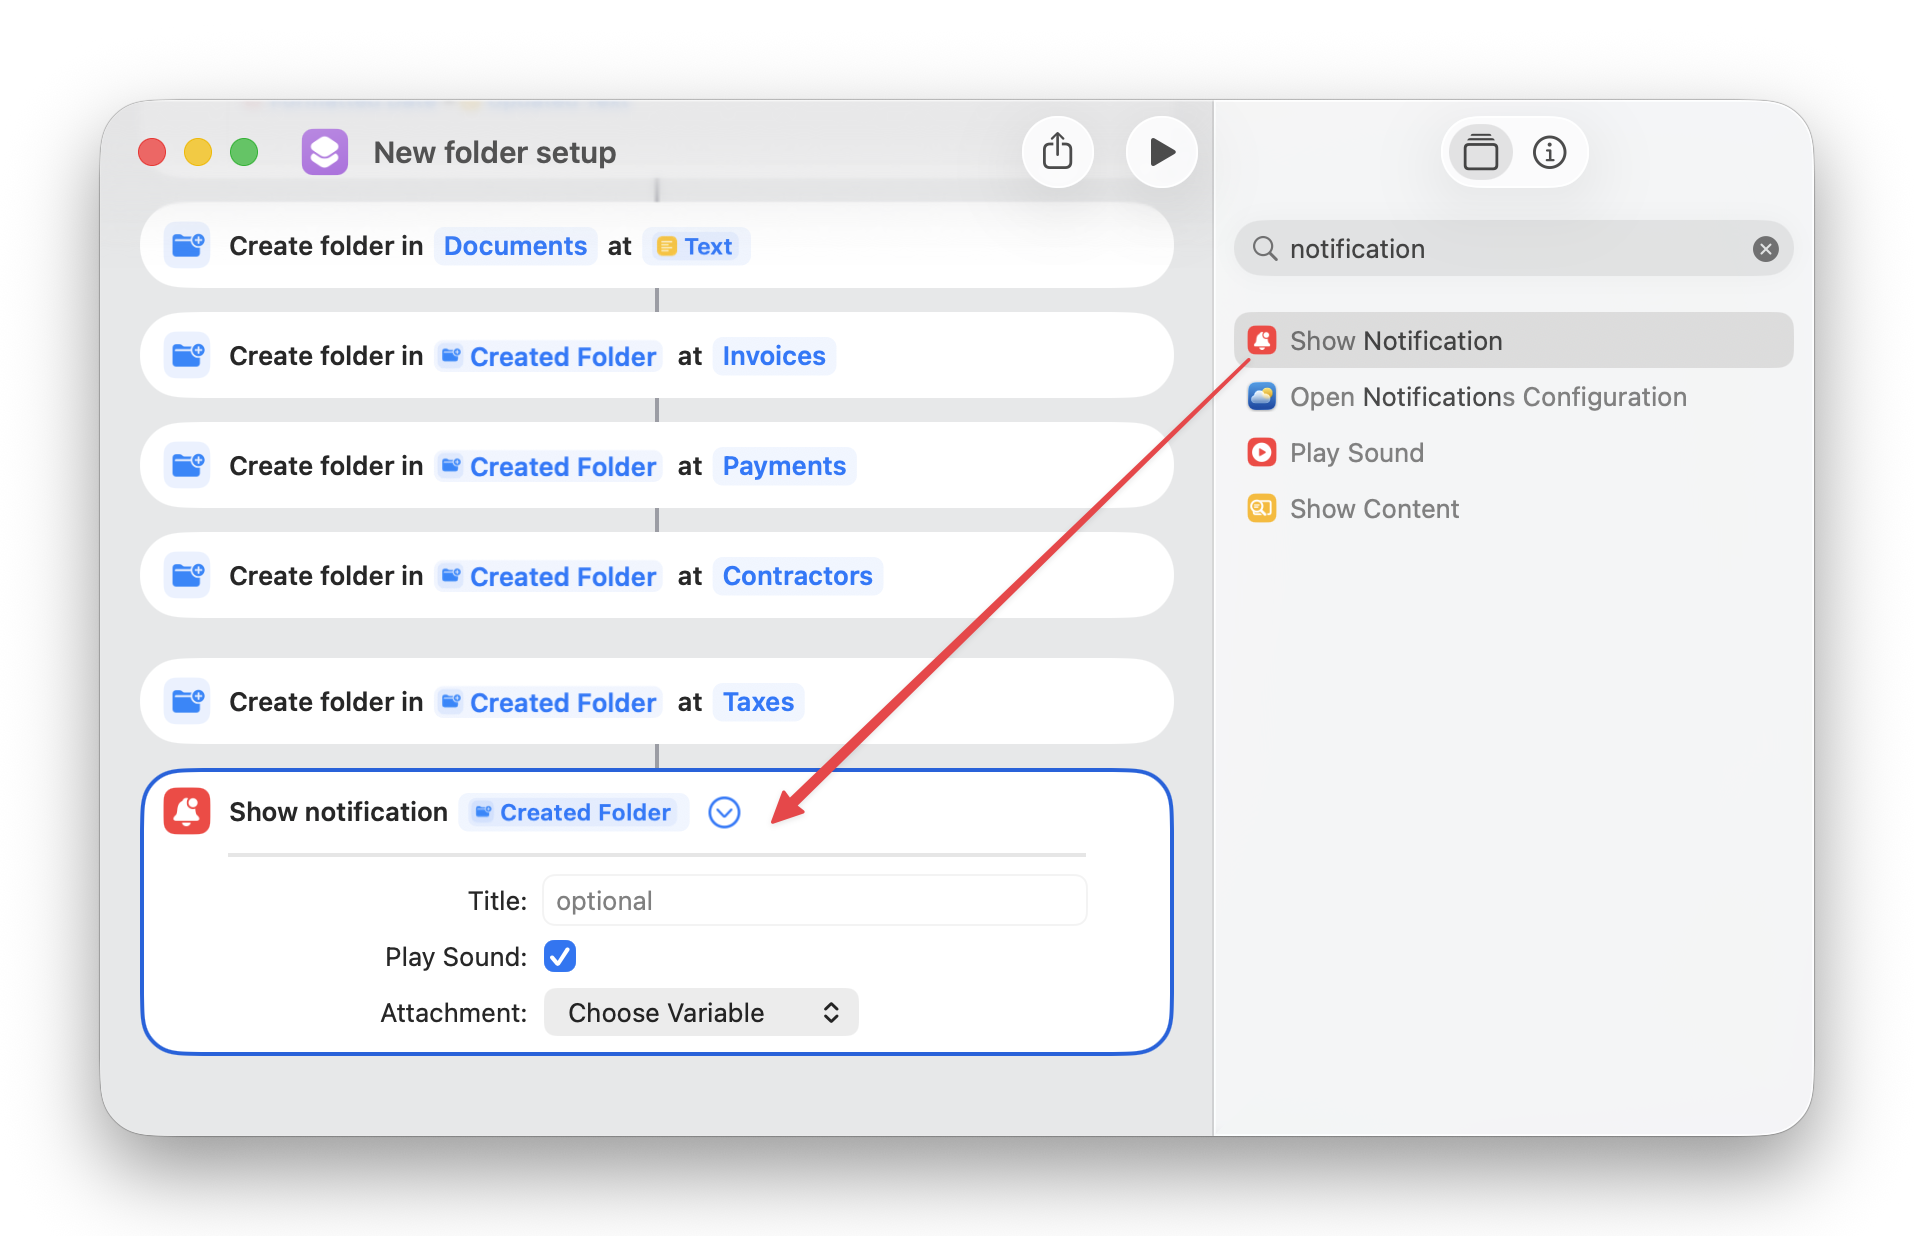
Step 5: Add a notification
There’s one final (optional) step: a notification that the workflow has successfully run. I say optional because the workflow will run in the background and still create the folders for you without it. If you’d prefer to know that it’s successfully completed, this is your last step in Shortcuts.
Search for and drag ‘Show Notification’ to the end of the workflow. If you leave it as-is, without making changes, your notification will display the shortcut and folder names.
By default, it will also play a sound. Click on the arrow if you’d like to add a title or remove the sound.
As usual, test the workflow and delete the parent folder.
Step 6: Schedule the automation
Now that the folders portion of the workflow is complete, it’s time to schedule when it will run.
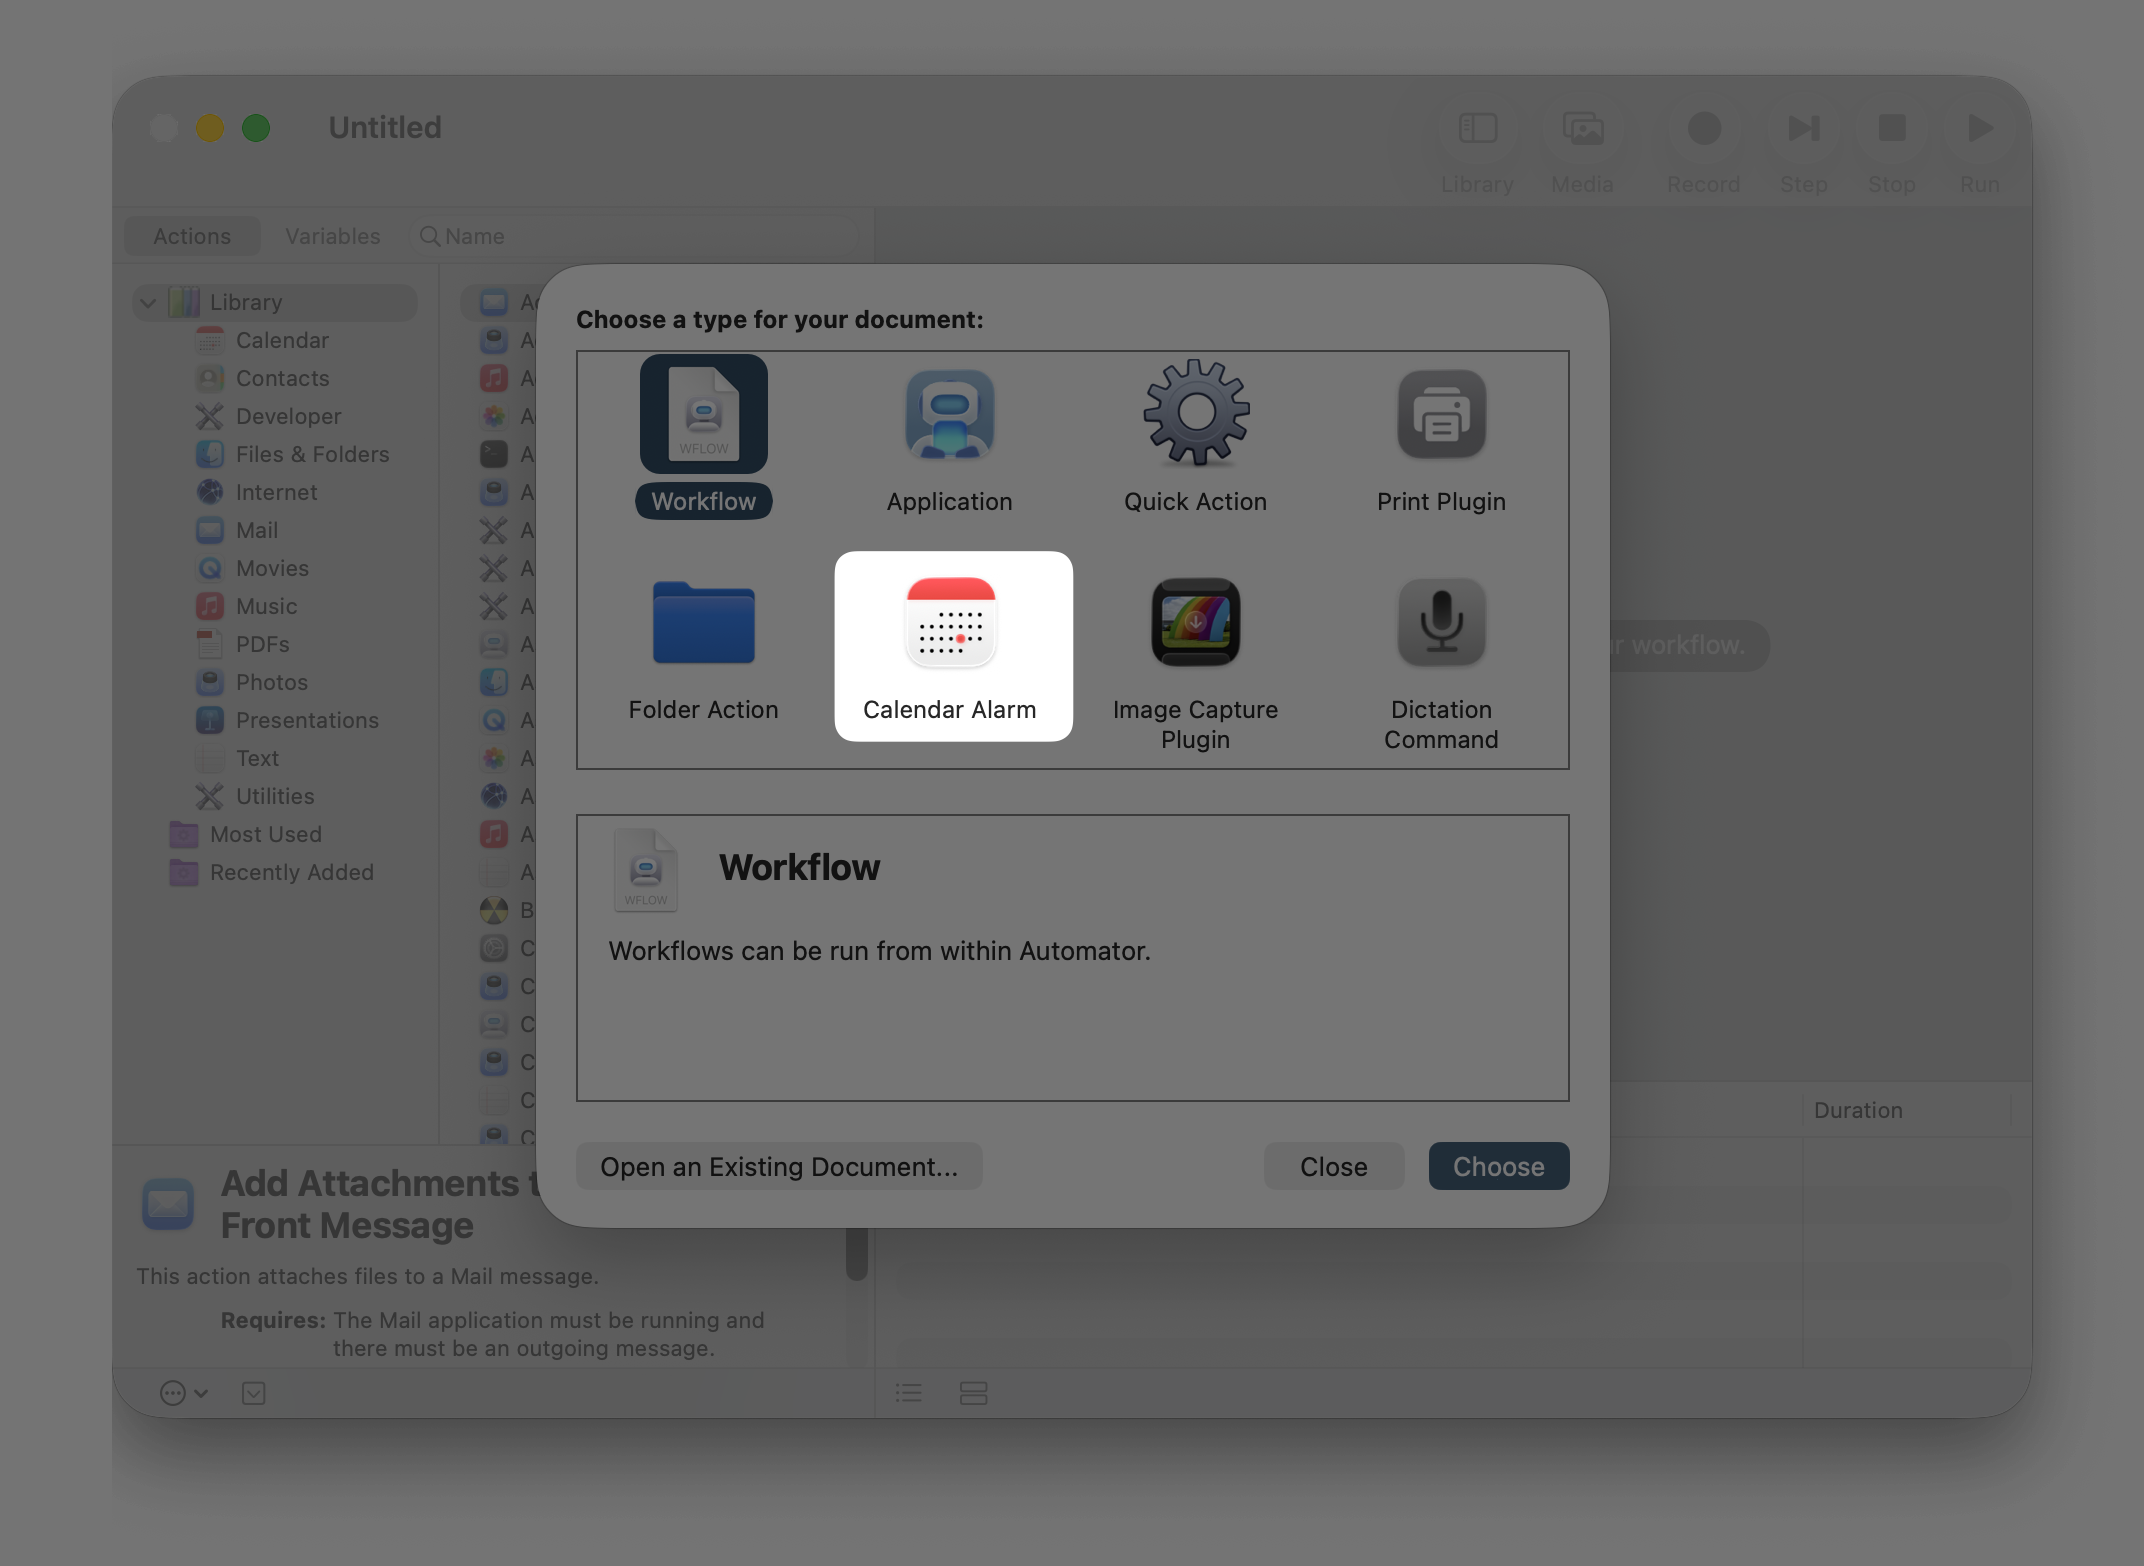
Open the Automator app on your Mac and click on ‘New Document’.

Next, select ‘Calendar Alarm’ and click Choose.
In search bar on the left, search for ‘Run Shell Script’ and drag the action to the right panel. Replace the word ‘cat’ in the text field with this:
shortcuts run "YOUR-SHORTCUT-NAME"
YOUR-SHORTCUT-NAME should be the exact name you set for the shortcut in Step 2. Use spaces if the shortcut name includes them.
Click on the ‘Run’ button on the top right of the screen to test the automation. You’ll see (and hear) the notification if you added one in Step 5. Check the Documents/Desktop/Dropbox etc. folder to confirm that the automation worked and the folders have been created. Again, delete the parent folder.
Now, go back to Automator and hit save (or Cmd ⌘ + S, if you prefer using keyboard shortcuts). Give the automation a name and click Save.
The Calendar app will automatically open, and the workflow will be saved for the date and time it was created. Double click and edit it like any other calendar event: set the date and time you’d like it to run. Don’t forget to set it to repeat every year!
💡 Tip: Your Mac needs to be on for the automation to run. It can be in sleep mode, but it can’t be shut down. If it’s shut down and doesn’t run, you can trigger it manually using Spotlight. Just pull up Spotlight, type in the shortcut name, and hit return.
How to set up the automation on a new computer
Your automation is ready to work on your Mac for as long as you need it. If you ever want it to stop, just delete the event from your Calendar.
It doesn’t transfer over when you switch computers, but there’s a quick fix:
- Shortcuts: Open the app settings on the Mac you used to create the shortcut and make sure iCloud Sync is checked. If it isn’t, check the box and then open the app on your new Mac to look for the shortcut.
- Automator: On your new computer, open the Automator app and schedule the automation (Step 6) again.
Of course, this only works if you have your Dropbox/OneDrive/Google Drive set up on the new computer as well. If not, you can simply edit the shortcut to save the parent folder in Documents or another local folder.
Make the automation your own
The setup takes a little time upfront, but once you have it up and running, you never have to think about creating folders again.
You can adapt it to your own structure — whether you have 5 folders or more than 25 — and change the frequency in the Calendar app if you need it to run monthly or quarterly instead of annually.
I chose Shortcuts + Automator over other options because I needed a workflow that would solve the problem without adding unnecessary cost or complexity. For a once-a-year folder setup, native macOS apps were exactly what I needed.
If you’re curious about the other automation tools I evaluated — like Zapier, Keyboard Maestro, and launchd — and why I ruled them out, I’ll be writing another post about that decision-making process soon.